Datel Robotek: A Recreated Robot Control Card for the ZX Spectrum
A faithful recreation of Datel's long out-of-production Robotek interface, corrected against the original schematics from Make and Program Your Own Robots.
A 16K or 48K Spectrum with corrupted or garbled memory is nearly always down to a single faulty DRAM chip somewhere in the bank, but with eight or sixteen identical-looking chips on the board, finding which one is dead by substitution alone is slow and easy to get wrong. This tester takes one chip at a time, out of circuit, and tells you directly whether it's good.
It's built around an Arduino Nano and a 128×32 I2C OLED display: a jumper selects which memory type is under test (4116, 4164/41256, or 4532 and pin-compatible parts), a ZIF socket takes the chip without bending any legs, and a single button press runs the test — a longer, sustained press starts it, brief taps cycle through the memory-type selection. Results, including the specific failing address if a chip is faulty, show up on the OLED. As the designer is upfront about: it's not a 100% guarantee — a chip can pass this test and still misbehave in a real circuit — but it's a fast first pass across a stack of pulled chips.
Designed by Mirco Gaggiottini ("Retrofixer"), released under a Creative Commons Attribution-NonCommercial (CC BY-NC 4.0) licence. Firmware, 3D-printable case files, and full build notes are on GitHub.
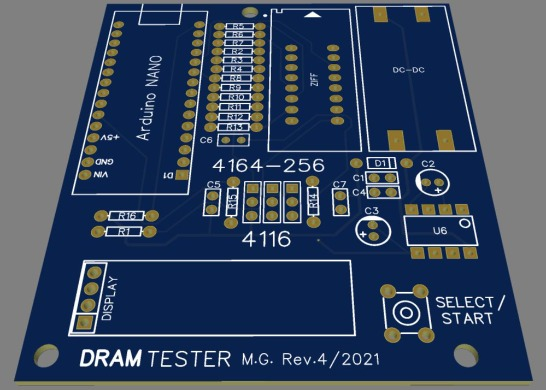
The Arduino Nano needs the provided .hex firmware flashed via
AVRDUDE (or the AVRDUDESS GUI if you'd rather not use the command line) —
no Arduino IDE compile step required unless you want to modify the
firmware yourself, in which case the u8g2lib display library is a
dependency.
| Component | Qty | Notes | Source |
|---|---|---|---|
| DRAM tester PCB | 1 | Shared design — order directly from the PCBWay project page | PCBWay |
| Arduino Nano | 1 | Flashed with the provided .hex firmware via AVRDUDE | |
| OLED display, 128×32, I2C | 1 | Shows test results and the failing address, if any | |
| MT3608 DC-DC boost converter | 1 | 4–5V input to 12V, for the DRAM supply rail | |
| 7660/7760 voltage converter | 1 | Charge-pump negative rail for the DRAM under test | |
| ZIF 16-pin socket | 1 | Zero-insertion-force — swap chips without bending pins | |
| Tactile switch, 6×6mm | 1 | Short press cycles memory type, long press starts the test | |
| 2.54mm male headers | 3 | Memory-type selection jumpers | |
| 100nF ceramic capacitors | 5 | Decoupling | |
| 10µF 25V electrolytic capacitor | 1 | ||
| 47µF 25V electrolytic capacitor | 1 | ||
| 47Ω resistors | 13 | ||
| 10kΩ resistors | 2 | ||
| 2.2kΩ resistor | 1 | ||
| BAT43 diode | 1 | Optional, per the schematic |
A faithful recreation of Datel's long out-of-production Robotek interface, corrected against the original schematics from Make and Program Your Own Robots.
An edge-connector board that pairs a Raspberry Pi Zero with a CPLD to give a 1983 ZX Spectrum 48K genuine, native HDMI output — no SCART, no RF modulator, no upscaler.
The classic port-31 joystick interface, built on a PCBWay board. Full write-up with build video and a complete component list.